概述
在2021的今天,构建一个 web 应用对于我们来说,并非什么难事。因为有很多足够多优秀的的前端框架(比如 React,Vue 和 Angular);以及一些易用且强大的UI库(比如 Ant Design)为我们保驾护航,极大地缩短了应用构建的周期。
但是,互联网时代也急剧地改变了许多软件设计,开发和发布的方式。开发者面临的问题是,需求越来越多,应用越来越复杂,时不时会有一种失控的的感觉,并在心中大喊一句:“我太南了!”。严重的时候甚至会出现我改了一行代码,却不清楚其影响范围情况。这种时候,就需要测试的方式,来保障我们应用的质量和稳定性了。
接下来,让我们学习下,如何给 React 应用写自动化测试(单元测试、集成测试)吧🎁
单元测试(纯函数(utils))
安装相关依赖:
- jest是测试库;
- @types/jest是jest对typescript的类型支持;
- babel-jest转换测试代码中高级语法;
ts-jest转换测试代码中typescript语法;
bash1
npm install --save-dev jest @types/jest babel-jest ts-jest
package.json文件中添加jest测试配置,使能够运行ts语法的测试代码;并在 “scripts” 配置中添加测试的命令:“test”: “jest”
json1
2
3
4
5
6
7
8
9
10
11
12
13
14
15{
"jest": {
"moduleFileExtensions": [
"ts",
"tsx",
"js"
],
"transform": {
"^.+\\.tsx?$": "ts-jest"
},
"testMatch": [
"<rootDir>/__test__/**/?(*.)(spec|test).ts?(x)"
]
},
}添加示例utils以及测试代码
/src/common/utils.ts
typescript1
2
3export function sum(a: number, b: number): number {
return a + b;
}/__test__/common/utils.test.ts
typescript1
2
3
4
5import { sum } from '../../src/common/utils';
test('adds 1 + 2 to equal 3', () => {
expect(sum(1, 2)).toBe(3);
});运行测试命令
bash1
npm run test
结果:
bash1
2
3
4
5
6
7
8
9
10
11
12
13
14$ npm run test
> parcel-test@1.0.0 test
> jest
ts-jest[main] (WARN) Replace any occurrences of "ts-jest/dist/preprocessor.js" or "<rootDir>/node_modules/ts-jest/preprocessor.js" in the 'transform' section of your Jest config with just "ts-jest".
PASS __test__/common/utils.test.ts
✓ adds 1 + 2 to equal 3 (1 ms)
Test Suites: 1 passed, 1 total
Tests: 1 passed, 1 total
Snapshots: 0 total
Time: 5.605 s
Ran all test suites.
单元测试(纯组件)
Testing Library官网:https://testing-library.com/docs/
React Testing Library Tutorial:https://www.robinwieruch.de/react-testing-library
使用 React Testing Library 和 Jest 完成单元测试:https://segmentfault.com/a/1190000022054307
安装相关依赖:
- @testing-library/react:测试react组件
@testing-library/jest-dom:为jest的断言expect增加一些dom相关的api
bash1
npm install --save-dev @testing-library/react @testing-library/jest-dom
编写测试代码:有一个 注意点,.tsx后缀文件的测试文件也需是.tsx后缀,因为测试的时候也会用到jsx语法
/src/antd/index.tsx
typescript1
2
3
4
5
6
7
8
9
10
11
12
13import React from 'react';
import { Button } from 'antd';
const Antd: React.FunctionComponent = () => {
return (
<div>
this is antd page
<Button type="primary">Button</Button>
</div>
);
};
export default React.memo(Antd);/__test__/antd/index.test.tsx
typescript1
2
3
4
5
6
7
8
9
10
11
12
13
14
15
16import React from 'react';
import { render, screen } from '@testing-library/react';
import '@testing-library/jest-dom';
import TestElements from '../../src/antd';
describe('<Antd />', () => {
test('antd page text should exist', () => {
render(<TestElements />);
expect(screen.getByText('this is antd page')).toBeInTheDocument();
});
test('button should exist', () => {
render(<TestElements />);
expect(screen.getByText('Button')).toBeInTheDocument();
});
});
单元测试(store(easy-peasy)相关的文件)
easy-peasy 官网:https://easy-peasy.now.sh/docs/tutorials/testing.html
测试actions
/__test__/todo/store/index.test.ts
1 | import { createStore } from 'easy-peasy'; |
测试依赖store的组件
编写测试代码
/src/todo/components/list/index.tsx
typescript1
2
3
4
5
6
7
8
9
10
11
12
13
14
15
16
17
18
19
20
21
22
23
24
25
26
27
28
29
30
31
32
33
34
35
36
37
38
39
40
41
42
43
44
45
46
47
48
49
50import React, { useCallback } from 'react';
import { Checkbox } from 'antd';
import { CloseOutlined } from '@ant-design/icons';
import { createTypedHooks } from 'easy-peasy';
import { TodoItemModel } from '../../common/model';
import { StoreModel } from '../../../common/store';
import style from './index.scss';
const { useStoreActions } = createTypedHooks<StoreModel>();
interface IProps {
todoList: TodoItemModel[];
}
const List: React.FunctionComponent<IProps> = ({
todoList,
}) => {
const { updateTodoItem, deleteTodoItem } = useStoreActions(actions => actions.todo);
const onIsFinishedChange: (value: boolean, item: TodoItemModel) => void = useCallback((value, item) => {
updateTodoItem({ ...item, isFinished: value });
}, [updateTodoItem]);
const onItemDelete = useCallback(item => {
deleteTodoItem(item);
}, [deleteTodoItem]);
return (
<div className={style['list-container']}>
{
todoList.map((item, index) => (
<div className="list-item" key={index}>
<Checkbox
checked={item.isFinished}
onChange={e => onIsFinishedChange(e.target.checked, item)}
>{item.content}</Checkbox>
<CloseOutlined
onClick={() => onItemDelete(item)}
className="delete-icon"
/>
</div>
))
}
</div>
);
};
export default React.memo(List);/__test__/todo/components/list/index.test.tsx
typescript1
2
3
4
5
6
7
8
9
10
11
12
13
14
15
16
17
18
19
20
21
22
23
24
25
26
27
28
29
30
31
32
33
34
35
36import React from 'react';
import '@testing-library/jest-dom';
import { StoreProvider } from 'easy-peasy';
import { render, screen } from '@testing-library/react';
import store from '../../../../src/common/store';
import TestElements from '../../../../src/todo/components/list';
describe('<List />', () => {
test('list should have two item', async () => {
// arrange
const mockList = [
{
'id': 1,
'content': 'aaaa',
'isFinished': true,
},
{
'id': 2,
'content': 'bbbb',
'isFinished': false,
},
];
const app = (
<StoreProvider store={store}>
<TestElements todoList={mockList} />
</StoreProvider>
);
// act
render(app);
// assert
expect(screen.getByText('aaaa')).toBeInTheDocument();
expect(screen.getByText('bbbb')).toBeInTheDocument();
});
});发现问题:
被测试的组件中,有CSS Modules相关的样式引入
1 | import style from './index.scss'; |
这个语句jest是处理不了的,需要添加模块mock
解决方法:
- 安装 identity-obj-proxy 模块 bash
1
npm install --save-dev identity-obj-proxy
- package.json文件中的 jest 添加下列配置项 json
1
2
3
4
5
6
7
8{
"jest": {
"moduleNameMapper": {
"\\.(css|less|scss)$": "identity-obj-proxy",
"\\.(jpg|jpeg|png|gif|eot|otf|webp|svg|ttf|woff|woff2|mp4|webm|wav|mp3|m4a|aac|oga)$": "<rootDir>/__mocks__/fileMock.js"
}
},
}
集成测试
除了模块单元的测试驱动开发,在系统功能测试阶段,我们希望自动化完成业务功能正确性的检测,此时我们就要考虑集成测试方案了。目前前端集成化测试自动化工具也有比较多。例如Cypress、selenium-IDE、CasperJS、Nighmare、Nightwatch、Dalekjs。本节我们使用的是Puppeteer。
Puppeteer是什么
Puppeteer 是 Chrome 开发团队在 2017 年发布的一个 Node.js 包,用来模拟 Chrome 浏览器的运行。
- Puppeteer 是 Node.js 工具引擎
- Puppeteer 提供了一系列 API,通过 Chrome DevTools Protocol 协议控制 Chromium/Chrome 浏览器的行为
- Puppeteer 默认情况下是以 headless 启动 Chrome 的,也可以通过参数控制启动有界面的 Chrome
- Puppeteer 默认绑定最新的 Chromium 版本,也可以自己设置不同版本的绑定
- Puppeteer 让我们不需要了解太多的底层 CDP 协议实现与浏览器的通信
官方称:“Most things that you can do manually in the browser can be done using Puppeteer”,那么具体可以做些什么呢?
- 网页截图或者生成 PDF
- 爬取 SPA 或 SSR 网站
- UI 自动化测试,模拟表单提交,键盘输入,点击等行为
- 捕获网站的时间线,帮助诊断性能问题
- 创建一个最新的自动化测试环境,使用最新的 js 和最新的 Chrome 浏览器运行测试用例
- 测试 Chrome 扩展程序
- …
给todo项目添加
因为puppeteer包需要下载chrome相关包,比较大,所以单独文件夹管理依赖,在需要的时候再安装依赖和执行测试脚本。在项目根目录新建文件夹 integration_test ,并初始化项目
bash1
2
3mkdir __integration_test__
cd __integration_test__
npm init -y安装相关依赖:
bash1
npm install --save-dev jest jest-puppeteer puppeteer
package.json 文件中添加 jest 配置
json1
2
3
4
5{
"jest": {
"preset": "jest-puppeteer"
},
}添加 jest-puppeteer 配置文件 jest-puppeteer.config.js,详细配置
javascript1
2
3
4
5
6module.exports = {
launch: {
// 设置为false会打开浏览器界面看到测试过程
headless: false,
},
};写测试脚本
integration_test/src/index.test.js
javascript1
2
3
4
5
6
7
8
9
10
11
12
13
14
15
16
17
18
19
20
21
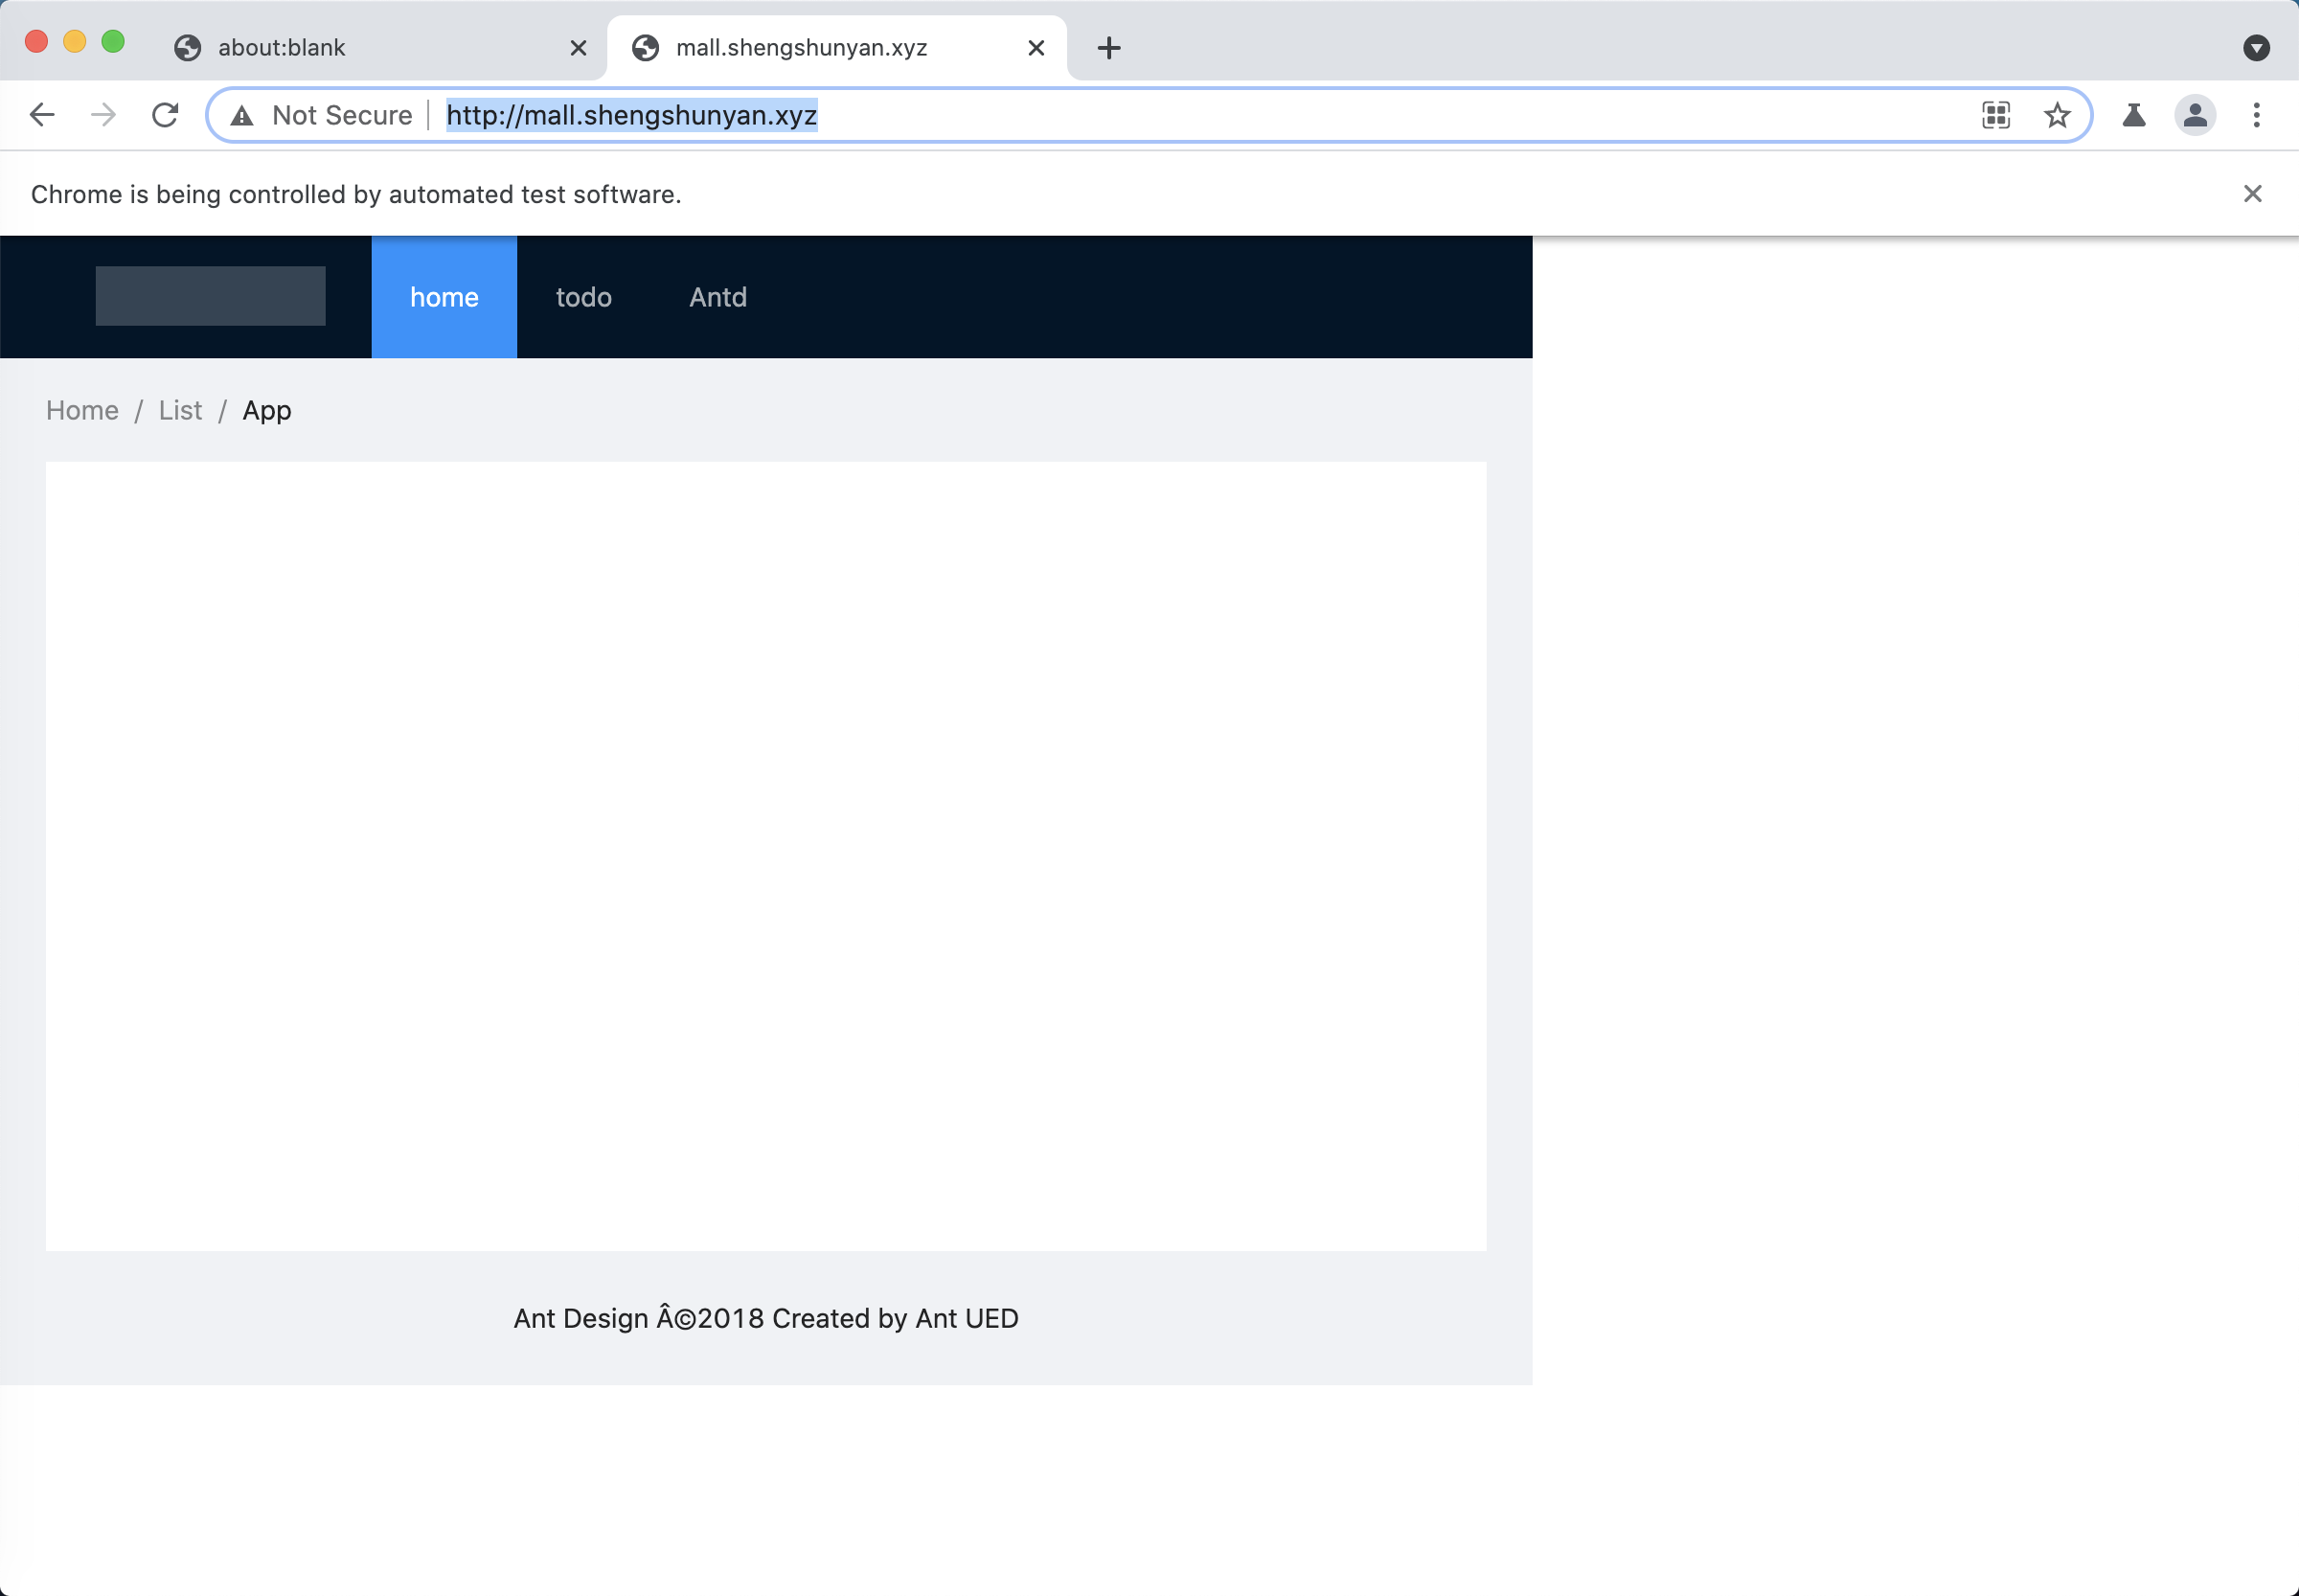
22describe('The entry of Application', () => {
beforeAll(async () => {
// 设置大概网页能请求到并渲染的时间
jest.setTimeout(30000);
await page.goto('http://mall.shengshunyan.xyz');
});
it('should display three menu', async () => {
await expect(page).toMatchElement('.ant-layout-header');
await expect(page).toMatch('home');
await expect(page).toMatch('todo');
await expect(page).toMatch('Antd');
});
it('should display breadcrumb', async () => {
await expect(page).toMatchElement('.ant-breadcrumb');
});
it('should display content box', async () => {
await expect(page).toMatchElement('.site-layout-content');
});
});package.json 文件中添运行测试脚本
json1
2
3
4
5{
"scripts": {
"test": "jest src"
},
}运行测试,查看结果
bash1
2
3
4
5
6
7
8
9
10
11
12
13
14
15
16$ npm run test
> test-package@1.0.0 test
> jest src
PASS src/index.test.js (25.382 s)
The entry of Application
✓ should display three menu (1391 ms)
✓ should display breadcrumb (427 ms)
✓ should display content box (422 ms)
Test Suites: 1 passed, 1 total
Tests: 3 passed, 3 total
Snapshots: 0 total
Time: 25.573 s
Ran all test suites matching /src/i.


