Flutter学习系列是自己学习Flutter的过程笔记
移动端常用组件
本篇文章主要介绍手机端上的一些常见组件
底部导航
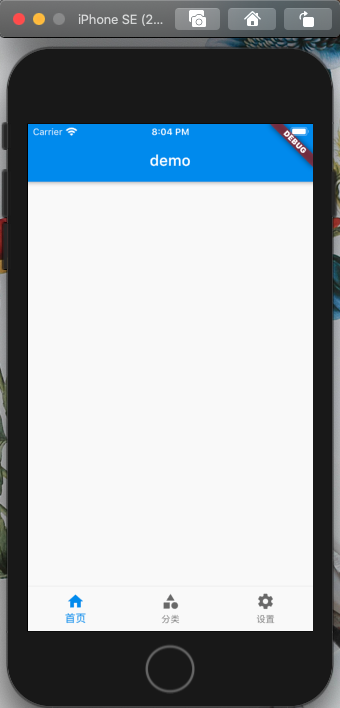
底部的模块导航是手机端最常见的导航组件,点击相关的模块icon或者名字,可以进入相关的模块
Scaffold组件的bottomNavigationBar属性可以设置app的底部导航
BottomNavigationBar的currentIndex属性设置当前选中的模块,onTap可以设置导航点击监听函数
1
2
3
4
5
6
7
8
9
10
11
12
13
14
15
16
17
18
19
20
21
22
23
24
25
26
27
28
29
30
31
32
33
34
35
36
37
38
39
40
41
42
43
44
45
46
47
48
49
50
| class MyApp extends StatelessWidget {
@override
Widget build(BuildContext context) {
return MaterialApp(
title: 'demo',
home: Scaffold(
appBar: AppBar(
title: Text('demo'),
),
body: null,
bottomNavigationBar: Bottom(),
),
);
}
}
class Bottom extends StatefulWidget {
@override
_BottomState createState() => _BottomState();
}
class _BottomState extends State<Bottom> {
int index = 0;
@override
Widget build(BuildContext context) {
return BottomNavigationBar(
currentIndex: this.index,
onTap: (int index) {
setState(() {
this.index = index;
});
},
items: [
BottomNavigationBarItem(
icon: Icon(Icons.home),
title: Text('首页'),
),
BottomNavigationBarItem(
icon: Icon(Icons.category),
title: Text('分类'),
),
BottomNavigationBarItem(
icon: Icon(Icons.settings),
title: Text('设置'),
),
],
);
}
}
|

顶部小组件
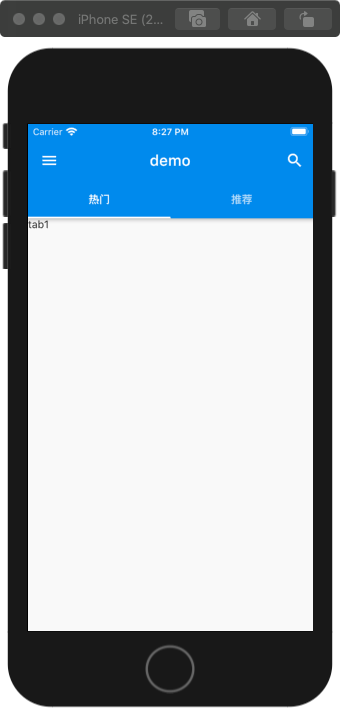
在Scaffold组件中的appBar头部组件,利用leading可以设置顶部左边操作按钮,利用actions可以设置顶部右边操作按钮
在Scaffold组件中的bottom底部组件,可以设置tab的头部TabBar,在body里可以设置tab的内容TabBarView;数组中的各个项根据顺序一一对应
1
2
3
4
5
6
7
8
9
10
11
12
13
14
15
16
17
18
19
20
21
22
23
24
25
26
27
28
29
30
31
32
33
34
35
36
37
38
39
40
41
42
43
44
45
| class MyApp extends StatelessWidget {
@override
Widget build(BuildContext context) {
return MaterialApp(
debugShowCheckedModeBanner: false,
title: 'demo',
home: DefaultTabController(
length: 2,
child: Scaffold(
appBar: AppBar(
title: Text('demo'),
leading: IconButton(
icon: Icon(Icons.menu),
onPressed: () {
print('menu');
},
),
actions: <Widget>[
IconButton(
icon: Icon(Icons.search),
onPressed: () {
print('search');
},
),
],
bottom: TabBar(
tabs: <Widget>[
Tab(text: '热门',),
Tab(text: '推荐',),
],
),
),
body: TabBarView(
children: <Widget>[
Text('tab1'),
Text('tab2'),
],
),
),
),
);
}
}
|

侧边抽屉
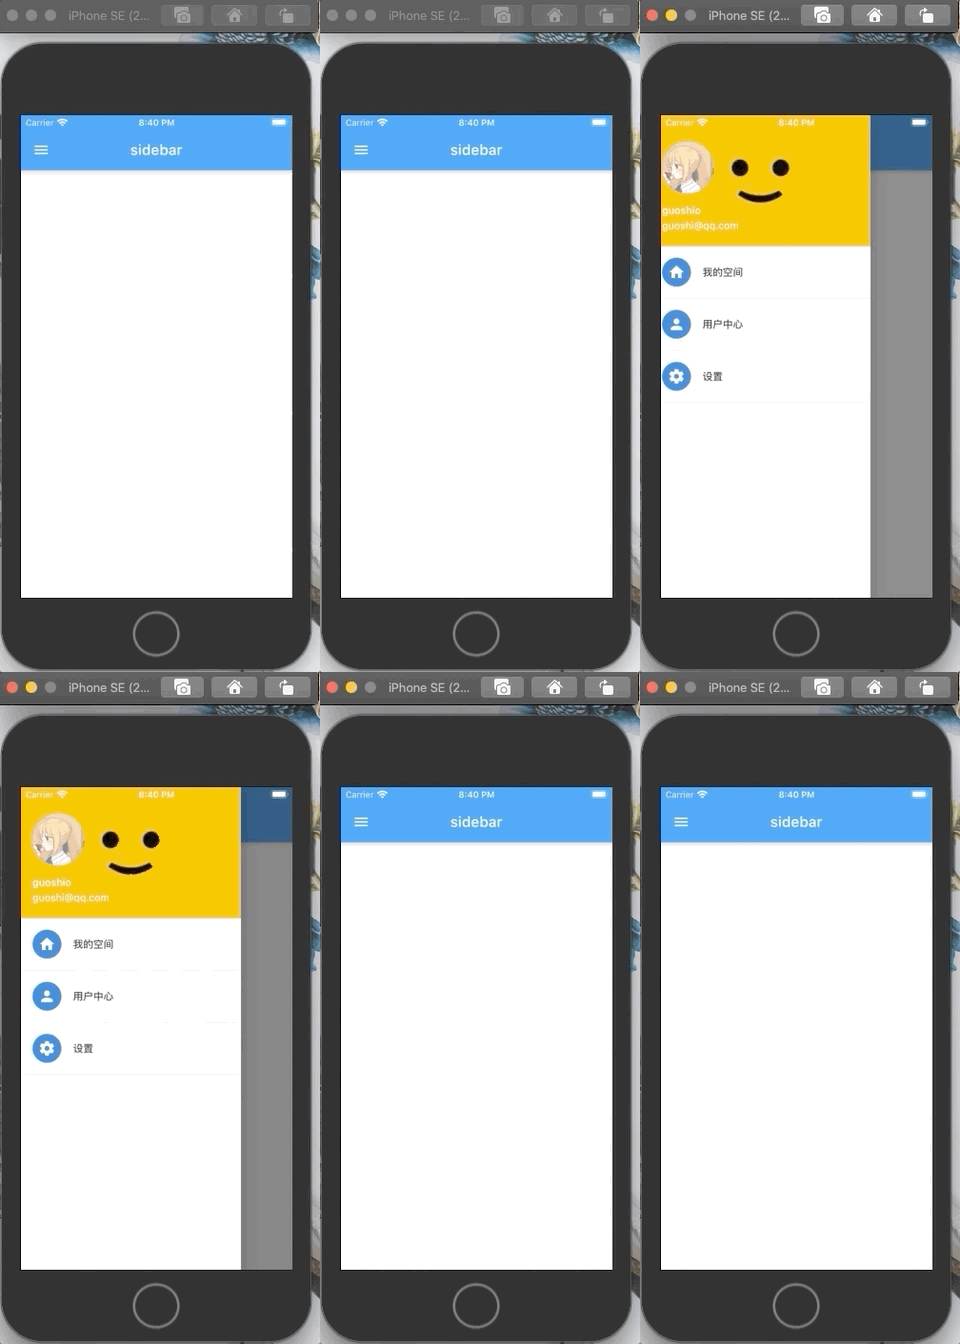
点击app左上顶部的侧边栏按钮,打开侧边栏,常用于展示用户个人信息
Scaffold组件的drawer属性用来设置侧边栏的具体内容
MaterialApp组件下的debugShowCheckedModeBanner属性可以设置隐藏调试时候的右上debug图标
1
2
3
4
5
6
7
8
9
10
11
12
13
14
15
16
17
18
19
20
21
22
23
24
25
26
27
28
29
30
31
32
33
34
35
36
37
38
39
40
41
42
43
44
45
46
47
48
49
50
51
52
53
54
55
56
57
58
59
60
61
62
63
64
65
66
67
68
69
70
71
72
73
74
75
| class MyApp extends StatelessWidget {
@override
Widget build(BuildContext context) {
return MaterialApp(
debugShowCheckedModeBanner: false,
title: 'demo',
home: HomePage(),
);
}
}
class HomePage extends StatelessWidget {
const HomePage({Key key}) : super(key: key);
@override
Widget build(BuildContext context) {
return Container(
child: Scaffold(
appBar: AppBar(
title: Text('sidebar'),
),
drawer: Drawer(
child: Column(
children: <Widget>[
Row(
children: <Widget>[
Expanded(
child: UserAccountsDrawerHeader(
accountName: Text('guoshio'),
accountEmail: Text('guoshi@qq.com'),
currentAccountPicture: CircleAvatar(
backgroundImage: NetworkImage(
'https://i0.hdslb.com/bfs/archive/3c26d1febef944de6c524a1597e9a34ec656c4e8.jpg@336w_190h.webp'),
),
decoration: BoxDecoration(
image: DecorationImage(
image: NetworkImage(
'https://i0.hdslb.com/bfs/archive/06873850299947819f2751d8ed77db9044a50e6e.png@336w_190h.webp'),
fit: BoxFit.cover,
),
),
),
),
],
),
ListTile(
leading: CircleAvatar(
child: Icon(Icons.home),
),
title: Text('我的空间'),
),
Divider(),
ListTile(
leading: CircleAvatar(
child: Icon(Icons.person),
),
title: Text('用户中心'),
),
Divider(),
ListTile(
leading: CircleAvatar(
child: Icon(Icons.settings),
),
title: Text('设置'),
),
Divider(),
],
),
),
),
);
}
}
|


